Overall Summary: I made the Tin Man with the pattern in Kristen Rask’s book. I also figured out my pattern for the Cowardly Lion, and you can find the Lion pattern I used below!
I recently bought the Wizard of Oz Crochet kit. I was obsessed with Wizard of Oz when I was a kid, and am still quite fond of it as an adult. It comes with book with 12 patterns, and all of the supplies needed to make the Tin Man and the Cowardly Lion. (It even comes with a crochet hook and embroidery needle, suggesting the kit is for beginners.)


I finally had time to start these and began with the Tin Man. Overall, it went okay. I noticed some hiccups in the pattern (for example, the split for the legs needs to be in the middle so the pattern needs adjustments there), but not a big deal at all.

This kit idea is adorable, and the yarn is really nice in particular. There was plenty of yarn included too, something I was worried about. However, I’m not sure this kit is really for beginners. The reviews on Amazon were mediocre, and I think I understand why.
I had some sparkly red yarn and tried to make the Ruby Slippers. Only problem was, the pattern was incredibly confusing to me! After doing some searching in the blogosphere I found I was not the only one who was a bit confused. Thankfully, I found someone who figured out the adjustments to Ruby Slipper pattern. Big thanks to Tina, I’m excited to try the pattern!
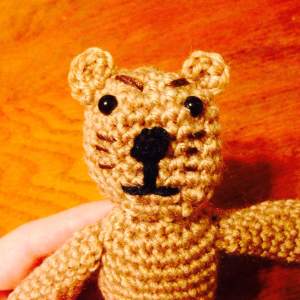
Next, I turned to the Cowardly Lion. Again, the pattern confused me. I was able to find the original Lion pattern from the book in a blog, but it contained the same errors as far as I could tell. I love the idea of making the Tin Man, Lion, Scarecrow, and Dorothy at least, so I’ve been trying to adjust the pattern ever since.
I was going to just write out the adjustments… but honestly I had to make A LOT of adjustments. It’s really more “adjustments” and very little left of the original pattern. Given that the original pattern is already available for free in another blog post, I decided to publish the pattern I made. I used the picture from the kit, but for the stitches pulled from my amigurumi knowledge. Here’s what I came up with:

Use 4.0mm crochet hook, unless otherwise noted.
Head:
Round 1: make a magic ring, and 6sc in ring (6)
Round 2: *2sc* in each stitch around (12)
Round 3: *1sc, 2sc in the next stitch* around (18)
Round 4: *2sc, 2sc in the next stitch* around (24)
Rounds 5-9 : 1sc in each stitch around (24)
Attach two safety eyes between rounds 5 and 6 (I put them a bit apart).
Round 10: *2sc, sc2tog* around (18)
Round 11: *sc, sc2tog* around (12)
Stuff loosely before round 12, then towards the end of round 12 (with one or two stitches left) make sure enough stuffing is in the head.
Round 12: sc2tog around (6)
Tie off and leave a long tail for sewing the head to the body.
Body:
Round 1: make a magic ring, and 6sc in ring (6)
Round 2: *2sc* in each stitch around (12)
Round 3: *1sc, 2sc in the next stitch* around (18)
Round 4: *2sc, 2sc in the next stitch* around (24)
Round 5: *7sc, 2sc in the next stitch* around (27)
Round 6: sc around (27)
Round 7:*7sc, sc2tog* around (24)
Rounds 8-9: sc around (24)
Round 10: *2sc, sc2tog* around (18)
Rounds 11-14: sc around (18)
Round 15: *4sc, sc2tog* around (15)
Rounds 16-18: sc around (15)
Stuff body
Round 19: sc3tog 5 times in back loop only.
Tie off and leave a long. Weave long tail through stitches to make sure it’s totally closed off. The rest of the tail can be used for sewing the legs to the body.
Nose:
Ch2, then sc in second chain from hook. Fasten off, leaving a long tail. I like to run the tail through the stitches a little bit to make the nose a little tighter. Then, use the rest of the tail to sew the nose to the face. Then, use the last bit of the tail to make a little black line under the nose, and a small mouth.
***Note, it might be easier to do the jaw line portion before sewing the nose and mouth to the face. I worked it out after, but in retrospect it would have been easier to do the jaw line now, THEN sew the jaw line, nose, and mouth all at once!
–I like to attach the pieces as I go. So, next I attached the head to body. Here’s what we have so far:

Legs (make two):
Round 1: make a magic ring, 6sc in ring
Round 2: *2sc* in each stitch around (12)
Round 3: *1sc, 2sc in the next stitch* around (18)
Round 4: sc2tog 6 times, then sc in next 6 stitches (12)
Round 5: sc2tog 3 times, then sc in next 6 stitches (9)
Rounds 6-12: sc around (9)
Tie off, leaving a tail for sewing. Stuff. I stuffed the foot pretty firmly, and then the leg somewhat lightly so that they don’t bulge. When you’re done with both legs, you can sew them to the body. I started by sewing 4-5 stitches from the last rounds together on the inside of each leg. I found it easier to attach the legs to the body as one piece.
Arms (make two):
Round 1: make a magic ring, 6sc in ring
Round 2: *2sc* in each stitch around (12)
Rounds 3-7: sc in each stitch around (12)
Round 8: *4sc, then sc2tog* around (10)
Round 9: sc in each stitch around (10)
Begin stuffing
Round 10: *3sc, then sc2tog* around (8)
Rounds 11-14 : sc in each stitch around (8)
Tie off, leaving a long tail to sew arms to the body, and place more stuffing if desired. When you are done with both arms, sew them to the body.
Ears (make 2):
Ch 2, and sc 5 times in second chain from hook. Fasten off, leaving a tail to sew ears to head.
Tail:
Round 1: make a magic ring, 4sc in ring
Rounds 2-4: sc in each stitch around (4)
At this point, I used the embroidery needle to push the beginning tail of yarn to the outside. The extra yarn will be used for the frizz on the end of the tail.
Rounds 5-18: sc in each stitch around (4)
Fasten off, leaving a tail to sew the tail to the body.
Once the tail is attached to the body, take a few pieces of yarn and thread them through the end of the tail. Tie each piece in the middle so that you have two strands sticking out per piece of yarn, each about an inch long. Then, frizz the end of the tail by pulling the strands within the yarn apart:

Now the main parts of the Lion are all made and attached. His left arm was attached a little bit too low, but once I do the fur on the chest it won’t matter so I am going to leave it there.

All that is left are the embellishments! We need to create the fur and curls for the mane, and add some embroidery details.
Embroidery on face & paws:
Use brown embroidery floss. I like to use one continuous piece of thread as much as possible, so I made the whiskers and eyebrows with one piece of thread first. I started with the whiskers, making three on each side of the nose. I used only one strand of thread for each whisker. Then, make two eyebrows above the eyes. I used two strands of thread for each eyebrow.
Next I made four accent lines on each of the paws on the legs and arms. I used two strands of thread for each accent line.


Jaw:
I used a 3.0mm crochet hook for this part. Ch 7, then fasten off. Make two, and attach them from either side of the nose down at an angle towards the neck.
(If you do not have a smaller crochet hook, a 4.0mm hook would be fine. I would just chain very tightly, or reduce the number of chains so that it fits well on the face.)
Top of head:
Chain 12, leaving long tails on each end. Thread an embroidery needle, twist the chains and weave one of the tails through. Pull tight to create a curl. Do this twice, and then sew the curls to the top of the head using the tails on each end. Each curl should stretch from the middle of the head out towards either ear. Once the curls are secure, thread the rest of the long tails so that they stick up at the “part,” where the two curls meet. Trim them so that they’re short and frizz.

Now, tie red embroidery floss to the top of the head and fray each side.


Curls:
I started out making 6 curls for the head.
Ch 30, then twist the chains into little curls. Thread one of the tails through an embroidery needle. Weave the needle through the curl, and pull.
I attached 3 on each side of the head. I used the tails to secure the curls in place, adding an extra stitch if I wanted the curl to sit in a certain place. I then weaved any extra length of the tail down to the neck to add to the teased chest fur in the next step.


I made a few more curls for the chin, this time only chaining between 15 and 20 (I like the nonuniform look). I made 4, but you can make however many you want. Again, I threaded the extra length of the tails down to the neck for the teased chest fur.
Chest fur:
I started by trimming the yarn I had on the chest from the previous step down to 1 inch. Then, I teased each piece.
Then, cut 2-inch pieces of yarn. Thread them on the chest and tie a knot so that there are two 1-inch pieces, and tease. Keep adding pieces of yarn until the chest is as full as you like. Add a couple of pieces of black yarn to add a little extra color to the mane.
Tip — If you have trouble with such short pieces of yarn, make them longer and then trim them down to 1 inch on each side. 2 inches of yarn was on the short side for my fingers, so after a few I started cutting them longer.
And viola!


Your lion looks great! Please let me know if and when you get to Glinda. Lol. I haven’t figured her out yet.
LikeLiked by 1 person
Will do. I wonder if the author will ever publish corrections!
LikeLike
Hi, I am doing tin man and struggling with explanation on feet and body , could you help me
LikeLike
Where are you in the pattern? I can go back to the book and see if I can figure out what changes I made!
LikeLike
Hi, Thank you for replying in the meantime I have fathomed it out. Tin man is finished. The book and instructions are not very well explained. Thanks again for replying. I will keep your instruction on the lion in case I ever do one again. Regards Sandra Carter
LikeLike
I am making the tin man. I’ve done all parts except the body/legs. I’m really having difficulty following the instructions for this part. Can you help?
LikeLike
It has been ages since I worked on these dolls! Unfortunately, the only memory I have for it is archived in the post here!
LikeLike
Tin Man Body/legs Rnd 1 Somewhere between the chain and rnd 3 JOIN IN THE ROUND with a slip stitch. (the increases give the shoulders and body shaping).
Now crochet in a circle for the body and the directions make more sense.
Rnd 16 Do exactly what the pattern says. (you will be working one leg only for eleven rows of 12 sts.).
THE LAST ROW of each leg is decreased through BACK LOOP. It will be perfect when you join the feet. Fasten off. (it looks too loose)
NOW THE SECOND LEG
Join new yarn in center of crotch and sc 12 st around the ‘hole’ in the body.
It doesn’t have to look pretty between the legs now. ‘Fix’ when you weave in ends.
IMPORTANT to have 12 stitches, 11 rows and a smooth look from body to leg.
FEET I think I made 3 or 4 and picked the two that were closest in size! They ended up looking good after stuffed and sewed to legs.
Hope this helps. The finished product is worth ALL the effort. Have fun!
LikeLike
Thank you so much for this remake. I was successful with Dorothy and Tin Man. Now making (trying) Scarecrow. The pattern for LEGS tells me to go from 12 stitches to 6, 10, 16, 5, 14, 10 in consecutive rounds!?
I’ll use your pattern for the Cowardly Lion with great appreciation. The Wizard of OZ is a classic.
LikeLike
I have no idea! I did not make the Scarecrow. The dolls are so cute but the patterns were so frustrating that I just stuck with the two shown in the post. Good luck!!
LikeLike